
Hmm…. actually… we can do this!
How? Here is a short guide:
1.1 Launch Adobe® Illustrator®
1.2 Edit Preferences
1.2.1 Windows
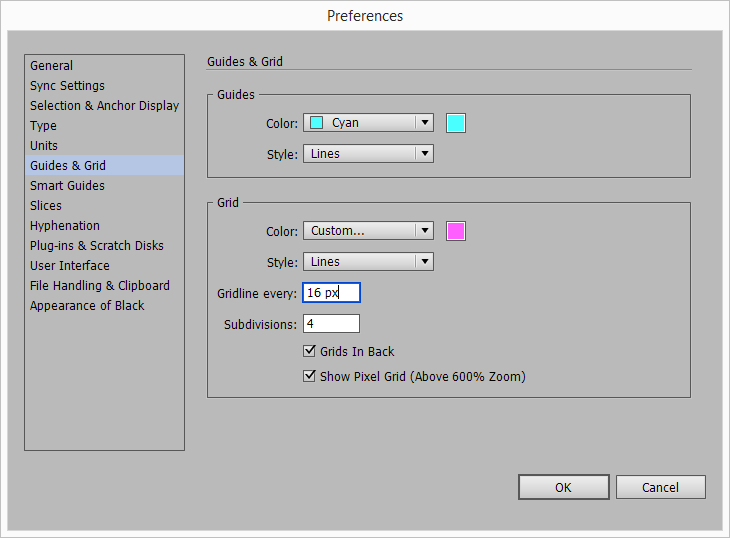
Go to Edit > Preferences > Guides & Grid…
Set Gridline every to 16 (I use pixels as my primary unit, but this could be anything else), and Subdivisions to 4:
1.2.2 Mac OS X
Go to Illustrator > Preferences > Guides & Grid…
Set Gridline every to 16, and Subdivisions to 4
1.3 Quit Adobe® Illustrator®
1.4 Locate your AI Preferences File
1.4.1 Windows
Note: Make sure that you have ‘Show hidden files, folders and drives’ option set under ‘Folder Options’. If you are not familiar with advanced Windows settings, this should help:
Windows 7: http://windows.microsoft.com/en-us/windows/show-hidden-files#show-hidden-files=windows-7
Windows 8: http://blogs.msdn.com/b/zxue/archive/2012/03/08/win8-howto-19-show-hidden-files-folders-and-drives.aspx

• AI CS6 (32-bit):
File Name: AIPrefs
File Location: C:\Users\[User Name]\AppData\Roaming\Adobe\Adobe Illustrator CS6 Settings\[language]\x86\
• AI CS6 (64-bit):
File Name: AIPrefs
File Location: C:\Users\[User Name]\AppData\Roaming\Adobe\Adobe Illustrator CS6 Settings\[language]\x64\
• AI CC (32-bit):
File Name: Adobe Illustrator Cloud Prefs
File Location: C:\Users\[User Name]\AppData\Roaming\Adobe\Adobe Illustrator 17 Settings\[language]\x86
• AI CC (64-bit):
File Name: Adobe Illustrator Cloud Prefs
File Location: C:\Users\[User Name]\AppData\Roaming\Adobe\Adobe Illustrator 17 Settings\[language]\x64
1.4.2 Mac OS X
• AI CS6:
File Name: Adobe Illustrator Prefs
File Location: /Users/[User Name]/Library/Preferences/Adobe Illustrator CS6 Settings/[language]
Note: To access the folder, go to Finder > Go > Go to Folder, and type:
~/Library/Preferences/Adobe Illustrator CS6 Settings/en_US

• AI CC:
File Name: Adobe Illustrator Cloud Prefs
File Location: /Users/[User Name]/Library/Preferences/Adobe Illustrator 17 Settings/[language]
Note: To access the folder, go to Finder > Go > Go to Folder, and type:
~/Library/Preferences/Adobe Illustrator 17 Settings/en_US

1.5 Open your AI Preferences File for editing
Since the AI Preferences File is a plane text file you can open/edit it with any text editor, for example Notepad (Windows) or TextEdit (Mac OS X)
1.5.1 Windows
Right Click on the File > Open With > select (for example) Notepad
1.5.2 Mac OS X
Right Click on the File > Open With > Other… > Applications > choose (for example) TextEdit.app
1.6 Modify AI Preferences File
Find the Grid record in your file. It starts with the /Grid keyword:
/Grid {
…
…
…
}
This could be something like this:
/Grid {
/Color
{
/Lite
{
/b
0.8999999762
/g
0.8999999762
/r
0.8999999762
}
/Dark
{
/b 0.8000000119
/g 0.8000000119
/r 0.8000000119
}
}
/Style 0
/Posn 1
/Vertical {
/Ticks 4
/Spacing 16
}
/Horizontal {
/Ticks 4
/Spacing 16
}
}
The Grid is controlled with two variables: Vertical and Horizontal. Each variable has two attributes: Ticks (stands for Subdivisions) and Spacing (for Gridline every). We can modify these settings and set it to whatever we like. We change the Vertical spacing to 9 with 3 subdivisions:
/Grid {
/Color
{
/Lite
{
/b
0.8999999762
/g
0.8999999762
/r
0.8999999762
}
/Dark
{
/b
0.8000000119
/g
0.8000000119
/r
0.8000000119
}
}
/Style
0
/Posn
1
/Vertical {
/Ticks 3
/Spacing 9
}
/Horizontal {
/Ticks 4
/Spacing 16
}
}
That’s it! Save and Close your file.
Note: Make sure the file is closed before you start AI
1.7 Launch Adobe® Illustrator®
Go to File > New
Go to View > Show Grid
16 : 9 with 4:3 subdivisions Grid should appear. Here is my result:
Pawel Kuc
http://63mutants.com/
No comments :
Post a Comment